Wanderland
The work I did while working on the game Wanderland, where I was the lead programmer
Project Overview
🛠 Tools:
- Unreal Engine 5
- C++
💡 Technical Skills Applied:
- C++ to UE5 code conversion & plugin architecture
- Plugin architecture
- Multi-threading (FRunnable)
- Blueprint API design & exposure
- Subsystem architecture (UEngineSubsystem)
- State machine implementation
🤝 Soft Skills:
- Team leadership (managing 2 programmers)
- Cross-discipline collaboration (designers, artists, hardware)
- Project planning & sprint management
- Problem-solving
Introduction
Wanderland is a real-life magical experience where you become a wizard. Cast elemental magic, bend reality and join your fellow mages to battle colossal, magical bosses in a chaotic world on the edge of collapse. Team up, take aim and become the Wizard hero that Wanderland needs!
That was the introductory line of the game that was playable on Industry day 30/06/2025 at BUAS. That is where the full game was playable, with the physical wands we made. The game can technically still be played if you have your own XR stage at home, but otherwise the full experience is sadly out of reach. The game can be downloaded on Itch.io right here, where you can fly around and admire the boss attacks and the art and programming that has gone into making this game a reality. You can also press the number keys to enable/disable certain environments or the 2 bosses (1 being just a tutorial boss however).
I worked on this game with a pretty large team, about 20 people including myself. I was the lead programmer, there were 2 other programmers I did my best to lead. I always made sure to stay up to date on what they were doing and what assistance they need, as a good lead should. It was extremely fun being a lead because you get to talk to so many people so often and working on documents and meetings was quite interesting too.
In this post I will go over the programming work I did for the project. While of course this was only a small part of what I did due to being the lead, that part is slightly harder to show off since communication mostly verbal.
I did want to mention that I did get approval of Evan (the person in the last video) before posting uploading the video I also got approval of Phil de Groot that I could post some of his code since he made the base of the code for the wand connection system, I mainly just ported it to UE5 and made it work there. He made it in pure C++, I had to convert that to UE5 code by changing the update loop, types and more.
I did remove the audio from all the videos for obvious reasons.
I understand the videos and not super professional, but I cannot exactly go back to try again since it was with very specific hardware and required a lot of manual work to get working too, so I apologize for the quality.
For the same reason, there are also some unfinished items in here. One of the bosses was a WIP version we worked on, and again, I cannot go back to re-record those moments.
I also will refer to people called “DP” from time to time, which were the designers who were the ones working on the actual experience. Us programmers mostly worked on tools to make their lives easier, as well as the boss attacks, but they worked on the gameplay loop, optimizing player fun etc.
AsteraTubes Helios lights
One of my main tasks was working on the AsteraTubes Helios lights (from now own will be shortened to Tubes). The idea was to make the boss attack in 4 different zones, and these zones would be shown to the player by using these lights. We had access to 4 Tubes at a time with 4 as backup so we could switch them out if the originals ran out of power. Each Tube has 8 lights inside of them, all with RGB values.
The lights needed to have be able to have multiple different behaviors so the DP could see what would work best for the boss attacks. Below are 2 videos, the first 1 being of the light just turning on, and the other one is a very fast flickering behavior.
Seizure warning for the flickering video!
The light can turn on
Seizure warning!!
The Blueprint for it is relatively simple in concept but a little more complicated when actually put together. This is S_LightstickData, the struct that every Tube has to keep track of any variables it might need. Do keep in mind that the name used was before I realized that they were called AsteraTubes, that’s why in code I refer to them as “lightstick”, since it was easy to understand. 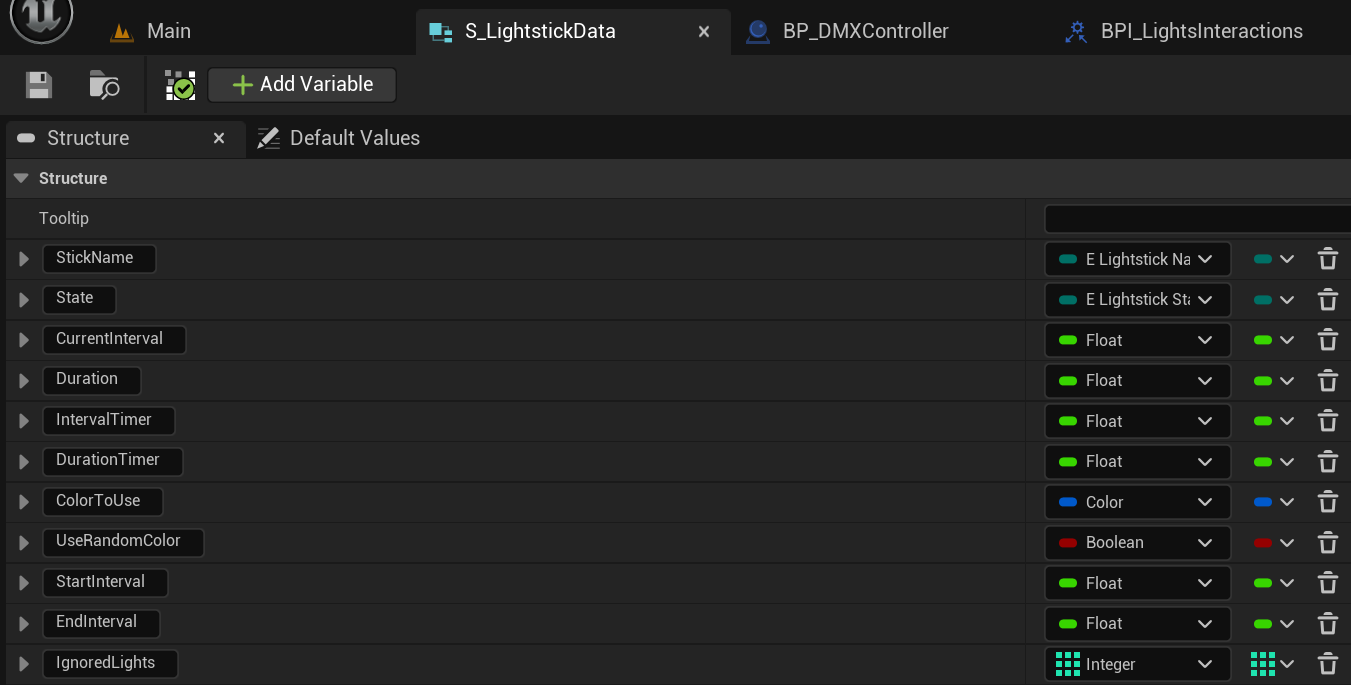 So the lights use a state machine to apply any state that they would need. As of right now there are 4 states, including a default one. We have “Waiting”, “SetOn”, “SetOff” and “Flickering”. I think that the names are quite self-explanatory as to what the Tubes should do with that state, so let’s get into the actual workings of the system.
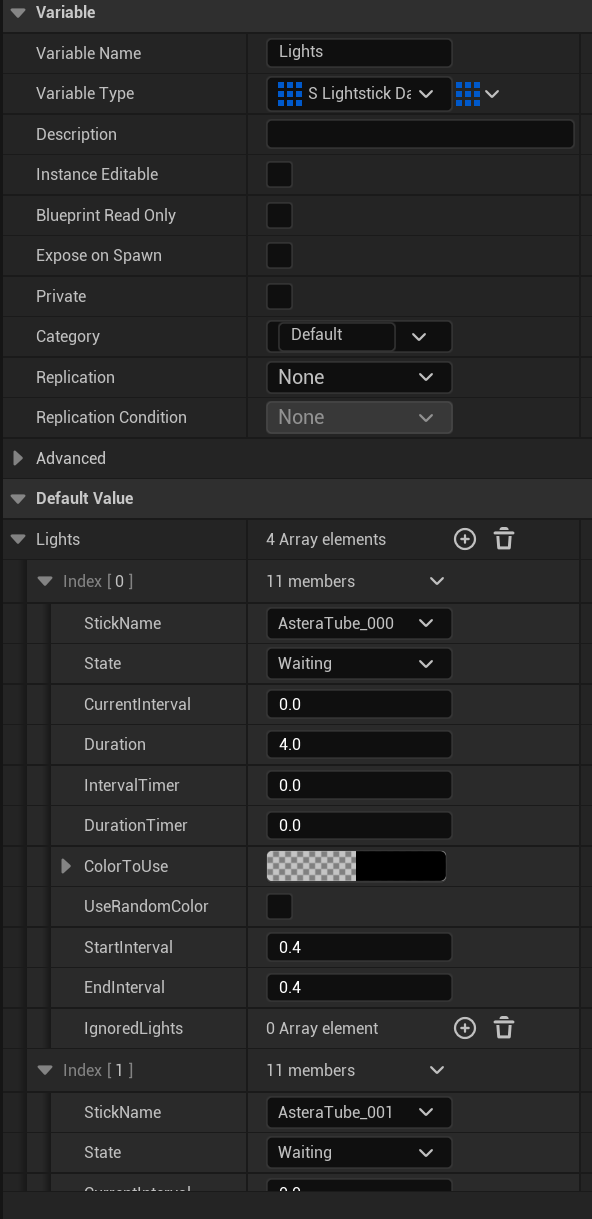
First of all, I have a list of S_LightstickData with 4 members in them. The reason I can just have a list with 4 members is because I always know that there will be 4 Tubes, no more, no less, so there is no need to set up some kind of loop to check which Tubes are active or anything (which is something I did at first) since the game cannot operate the way we want it to without exactly 4 Tubes, thus, the defaults work fine. The only difference between each element, at least at the start of the program, is the name, which is an enum called E_LightstickNames. I used strings at first, however, since the names are static (as in, they never change), I thought having it as an enum would make it much easier for the DP and/or other PRs to use. For our boss’ attack zones, we use numbers 0 through 3, which I only found out about later since that feature was still being worked on, but that system fits perfectly with that of my lights. Simply cast that int to an E_LightstickNames and they’ve got the Tube they want to modify. Note: Due to modifications made during the project after playtesting, we only utilize 3 out of these 4 lights. The code is still identical, it is just that 1 member of the array goes unused.
Next up, updating all the lights. Since every Tube has their own state and needs to be able to update independently, I decided to have a simple tick loop that updates any timers and calls functions related to the state the Tube currently is in.
Before we head to the Tick function though, it is important that the lights have a state that needs to be updated. For my code, I have 4 different states it can be in, Waiting, On, Off or Flicker. There was also a fifth state planned which was Wave, but since nobody was sure whether we even wanted that and it taking a while to program, we decided to drop that idea during Sprint 2 and instead we focused on the Wand Connection Plugin though more on that later.
So, there are 3 different functions that can be called in order to set the behavior of the light. 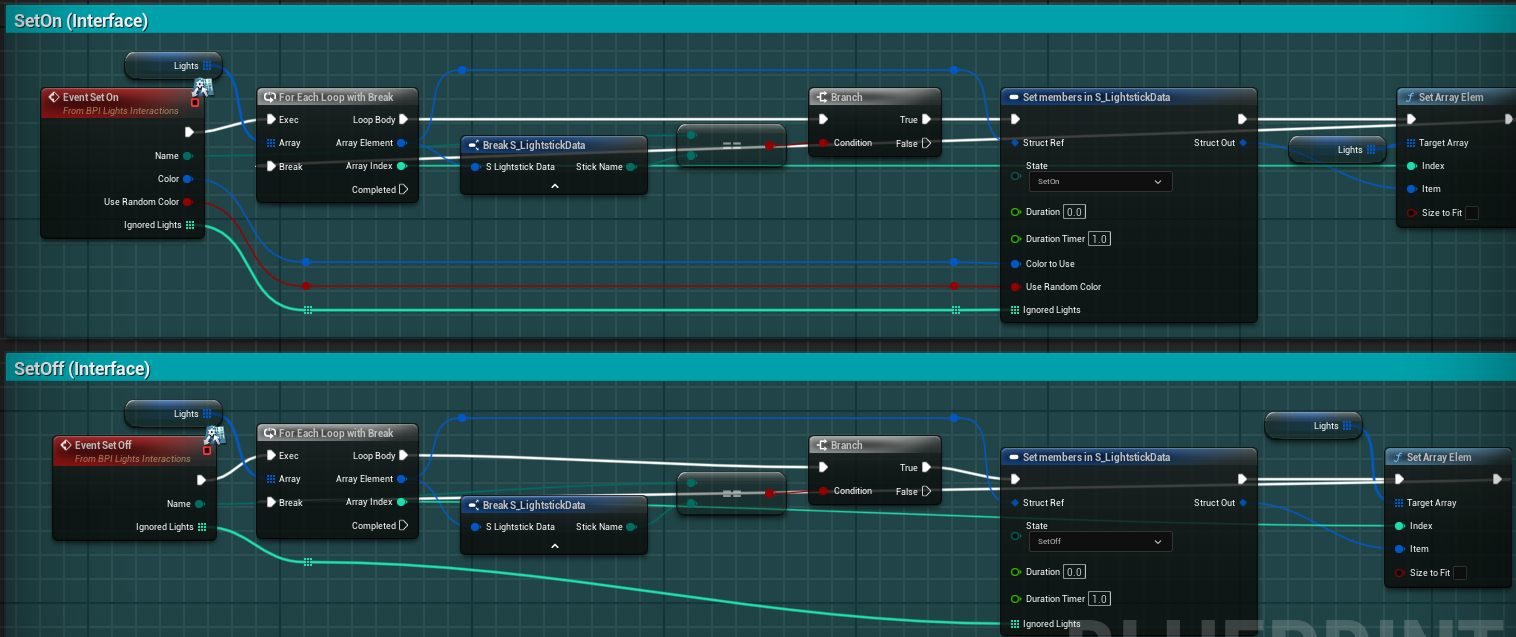
Here’s both the on and off functions that can be called. They are extremely similar so that is why I am showing both at the same time. I get the item in the array they want to get, so 1 of the 4 lights, then set their state to SetOn or SetOff. SetOn also requires a color and a bool for if they want to use a random color instead.
SetFlicker is pretty much the same, but again with more data, like a duration and tick frequency.

These functions were initially meant to be called with an interface, but since the DMX Controller is so small in size, I decided it was not worth setting up a singleton or something similar when the size map looks like this:
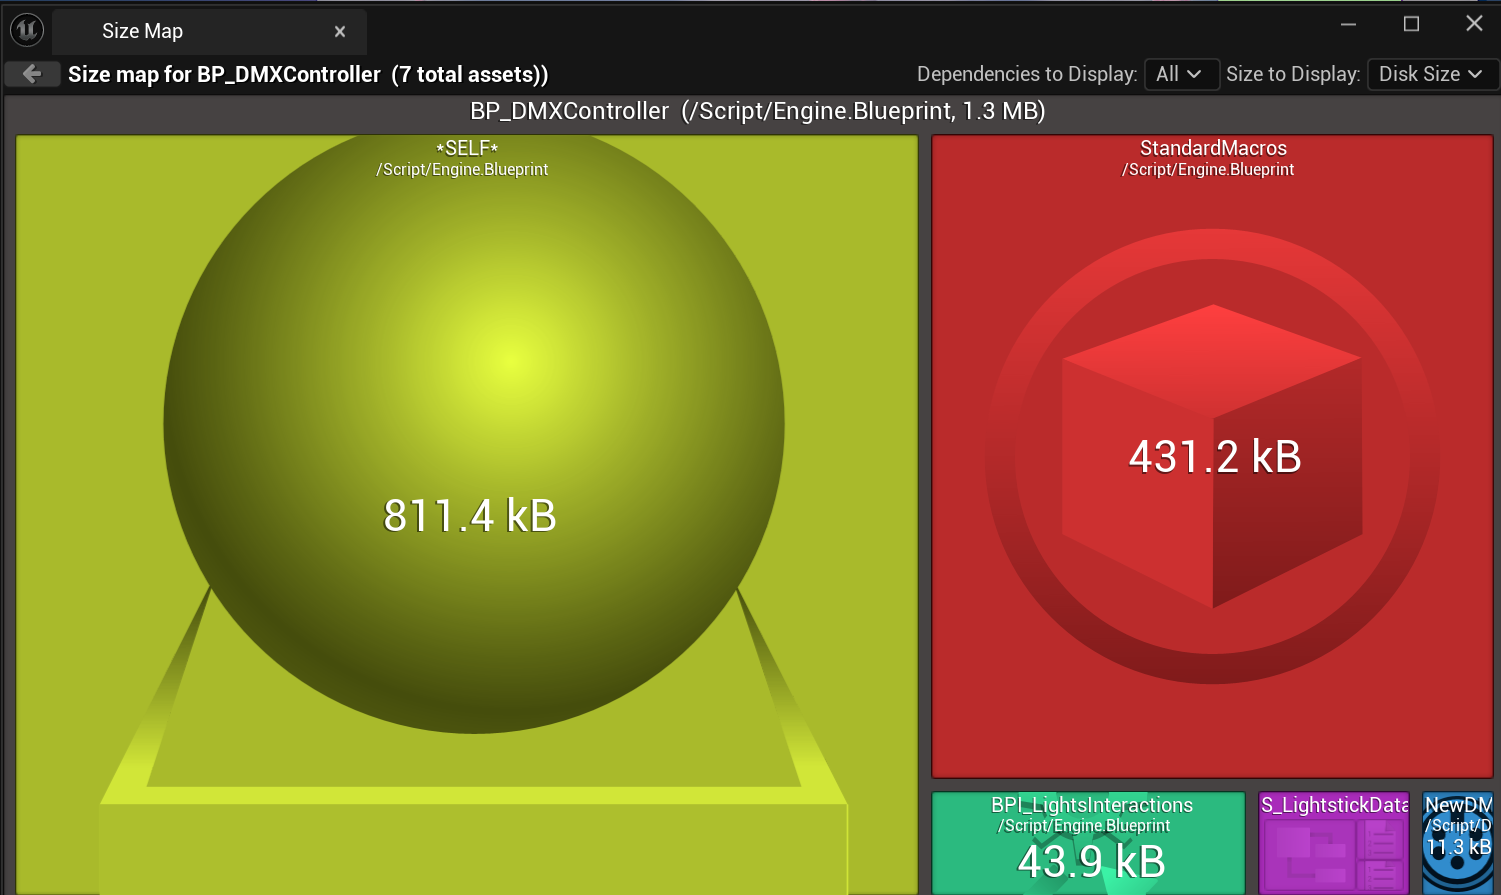
Those 1.3 MB were never going to make a big difference, unlike some choices made by the DP that added hundreds of MB to other files just because they cast to other BPs.
Next, we’ll start the Tick routine.

I will admit that the code ended up a little tangled and messy, however, that is what the comments are for. First, all of the intervals get updated. As was shown in the struct itself, it has both a Start- and EndInterval, and during that function I lerp from Start to End based on how far along the duration is. Then, if the state isn’t “waiting” we update the both the interval and duration timers and check whether or not the state should update. If it should, then we set the boolean in the array to true, otherwise, it is set to false.
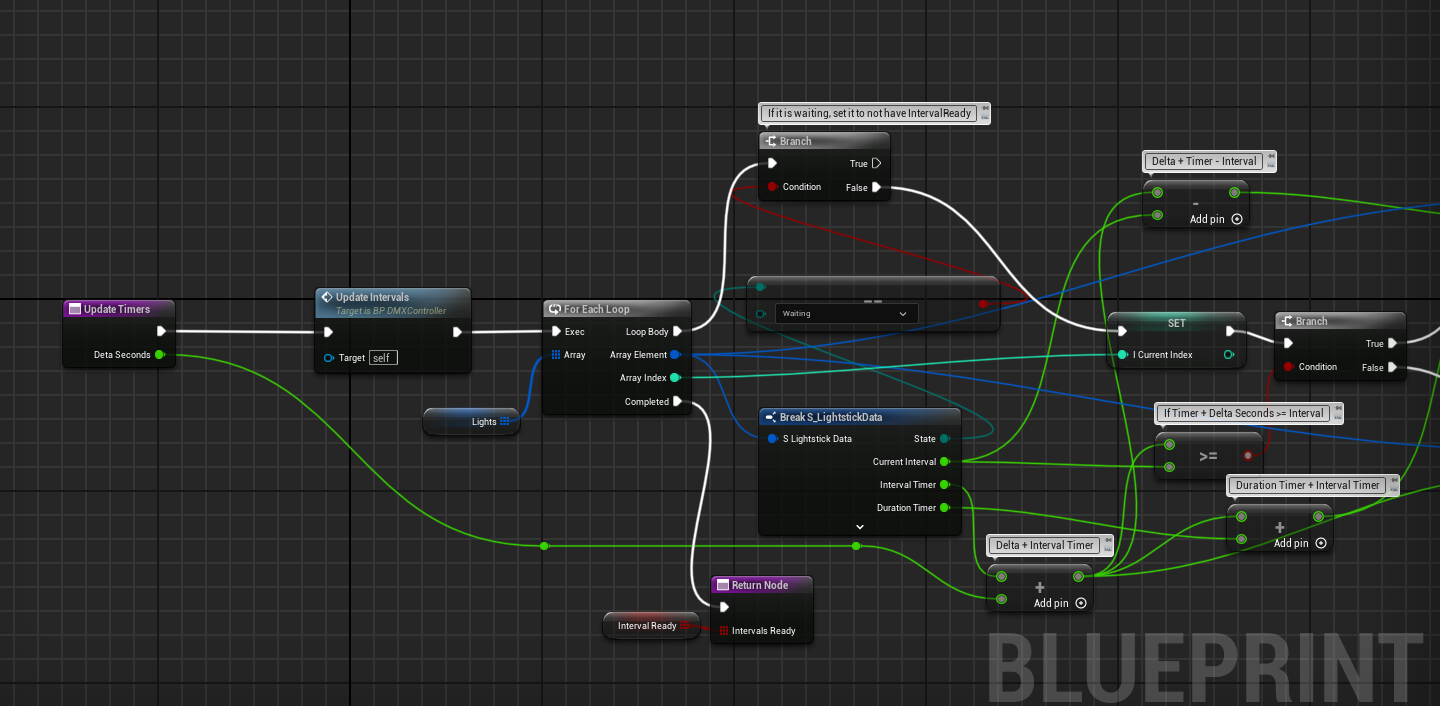

So, now we know which lights are ready, it’s time to update them. Over time this loop did get a bit messy, however, that’s what the comments are for.
First we need to check which intervals are ready, then if it is ready, we go into the sequence. 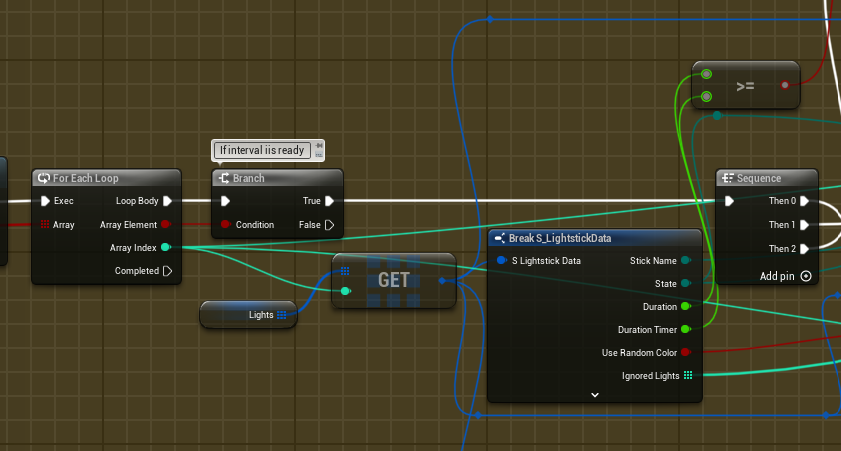
The first thing to do in the sequence is randomize the color if the user wants that.

Then, we call the function for the current state the light is in.
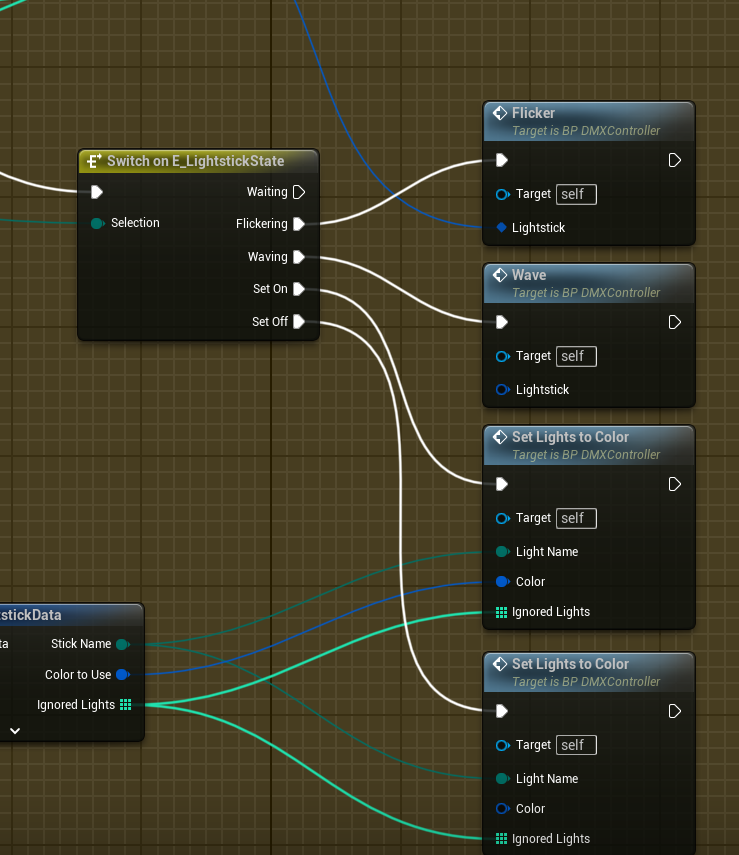
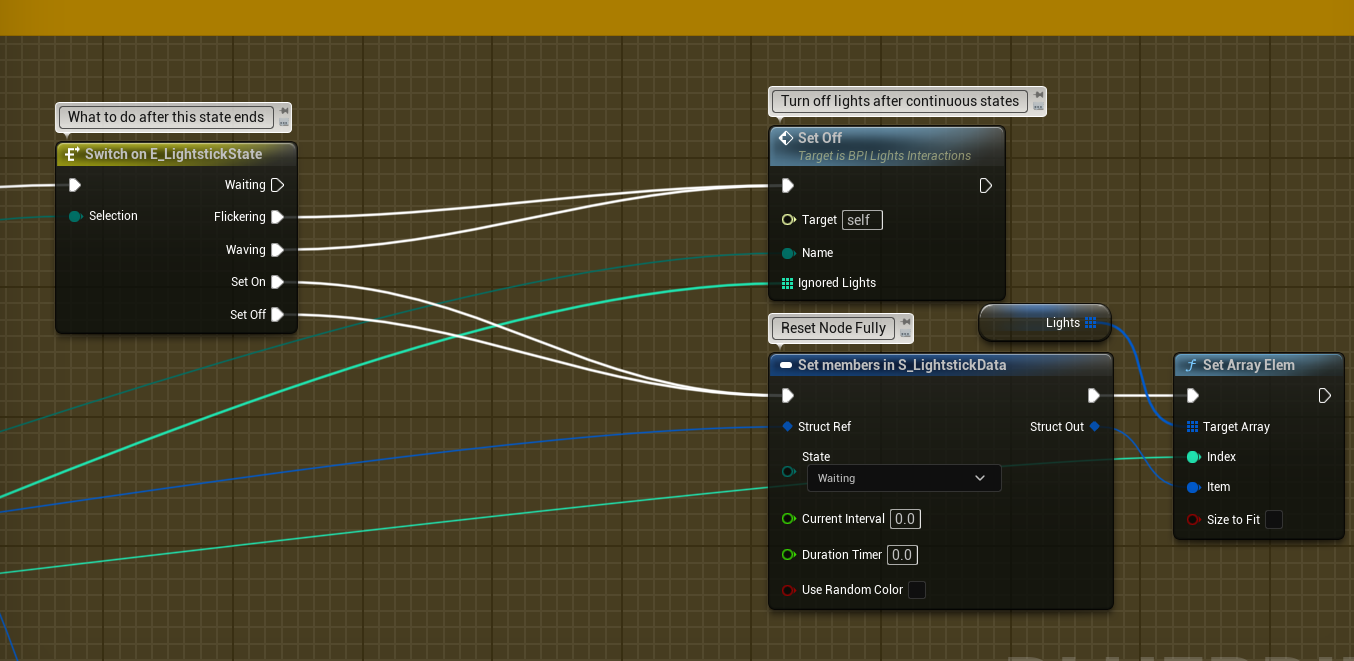
Lastly, we change the state of the light if needed. For instance, when we turn on/off the light, we then want its state to become Waiting instead. After ending Flickering, the lights should turn off, this will make sure that the lights never stay on after Flickering ends. As shown in the image, Waving would also end with the lights turning off.
All of that work and it ends up looking something like this when the boss attacks:
So I didn’t work on the boss this project, however, this seems to me like the code they call in order to make the lights flicker, it is a Function called “HighlightDangerZone”.
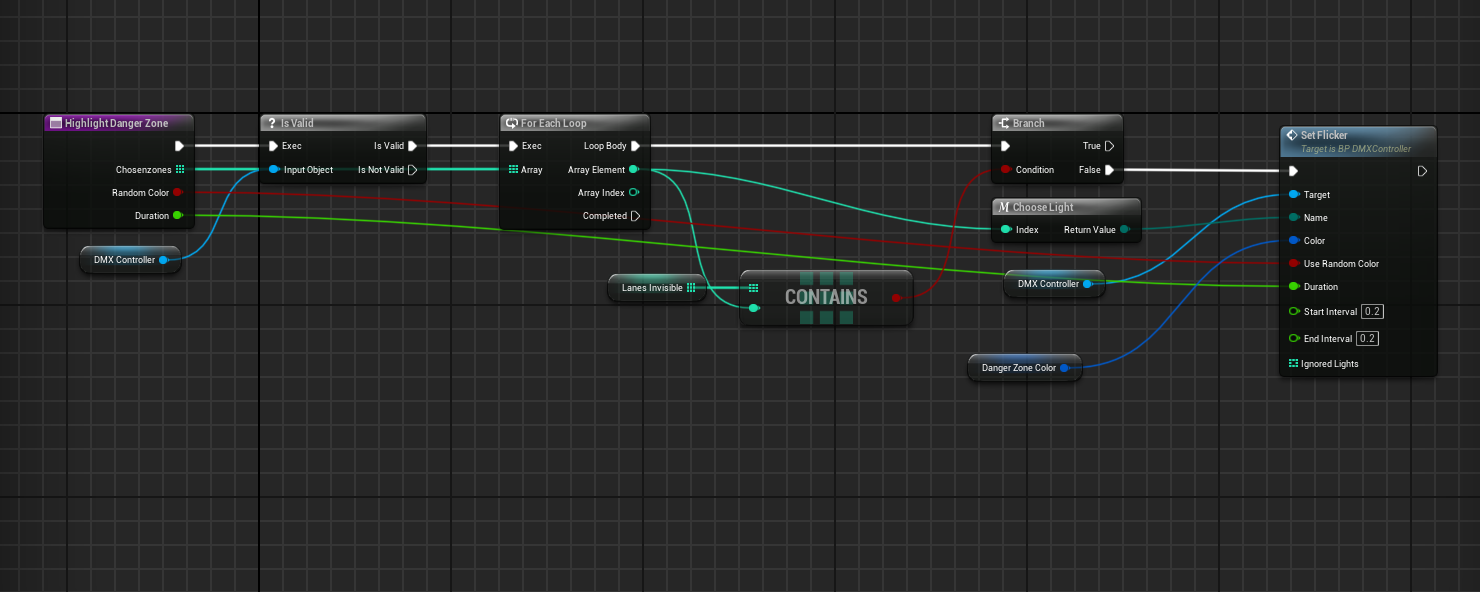
This is how one would use the functionality I gave them access to. The target the DMX Controller, which, the name of the light is an enum to make it easier for DP to find, they have a custom color they set as well as a boolean for using a random color (which is never used for as far as I know). They also set the duration and keep the interval the exact same over the course of the attack, which is a shame as I did bring up numerous times that it could flicker faster as the attack came closer, however, design is not something I have that much control over if at all really.
It is however that simple to use the lights. I talked a lot with Robin (the PR who worked on the Bosses for the entire project alongside some other things) about what he wanted and about how we wanted to go about implementing this and as you can see, despite some unused functionality, is super simple to use with enough customizability.
Custom Wand Connection Plugin
So my second main task was creating a custom Plugin for Unreal that would allow us to connect the wands to Unreal and allow us to controls its behavior (Vibration and LED colors) by using Blueprint nodes.
This requires a bit of an explanation so that will come first, the actual work comes right after.
We always wanted custom wands, however, Phil was working on a personal project where he had a custom wand with LEDs and a small rumble motor inside as well as a little chip that would allow it to connect a computer. He also had quite a lot of code already, however, that was in just C++. We really wanted to make the wands more interactive by using those techniques we saw Phil use and he agreed to help us out wherever possible. The thing is that we couldn’t just copy-paste all his code from C++ straight into Unreal and expect it to work, so we decided that someone should convert Phil’s scripts’ code from C++ to Unreal (at least the main big script). I suggested that it should be a plugin since a plugin could be made in a separate project and would prevent forcing the entire team from installing Visual Studio and making them understand how to build the project. Sure it wouldn’t have taken long, but could’ve caused confusion if any issues would arise, so a plugin was the better approach. Then there was also the control part, we had to be able to change the behavior of the wand using blueprint nodes, since we have a blueprint-only project.
So, the plan was, a custom plugin for UE5, written in C++ that would expose access to functionality (vibration and colors) through blueprint nodes.
Since Robin was busy with the boss, Evan was still doing some 3Cs and I had very little left to do, I took on this task.
Phil gave me all the code he had for the wands and I started on converting that from C++ to UE5, which required me to learn how Unreal handles includes, types and even multi-threading, so let’s start with the conversion part.
It is a little difficult to explain, so I will start with the simple stuff, variables.
Also please keep in mind that, while I did write a lot of my own code and converted a lot of Phil’s, I did not have time to 100% understand every line of code, so while I understand the bits I had to convert and modify, I might make some minor mistakes or oversights in my shorter explanations.
This is Phil’s code:
1
2
3
4
5
6
7
8
9
10
11
12
13
14
15
16
17
18
19
20
21
22
23
24
25
26
27
28
29
class ConnectionHandler

public:
	void StartListeningForAdvertisements();

	void Update();

	void SendToAllClients(const INetworkMessage& a_packet);

private:
	void BackgroundAdvertisementListener();
	void OnClientReceivedPacket(std::unique_ptr<INetworkMessage> a_message, ClientConnection& a_client);
	void DispatchReceivedPackets();

	std::shared_ptr<ClientConnection> FindClientByConnectionId(uint32_t a_connectionId);

	std::thread m_advertisementThread;
	std::unique_ptr<PCL::UdpClient> m_advertisementClient;
	std::unique_ptr<PCL::TcpListener> m_listener;
	uint32_t m_instanceIdentifier{};

	PCL::TimePoint m_lastHeartbeatSendTime;

	std::mutex m_clientsMutex;
	std::vector<std::shared_ptr<ClientConnection>> m_clients;
	std::mutex m_receivedPacketQueueMutex;
	std::queue<std::pair<std::unique_ptr<INetworkMessage>, uint32_t>> m_receivedPacketQueue;

	uint32_t m_lastConnectionId {1};
And this is how it looks in Unreal 5’s C++:
1
2
3
4
5
6
7
8
9
10
11
12
13
14
15
16
17
18
19
20
21
22
23
24
25
26
27
28
29
30
31
32
33
34
35
class ConnectionHandler

	void StartListeningForAdvertisements();

	void Update();

	bool SendToAllClients(const INetworkMessage& a_packet);

	bool SendToClient(const UINT32 id, const INetworkMessage& a_packet);

protected:
	// Returns true when the Ad was activated
	bool BackgroundAdvertisementListener(double lastAd);
private:
	void OnClientReceivedPacket(TUniquePtr<INetworkMessage> a_message, ClientConnection& a_client);
	void DispatchReceivedPackets();

	TSharedPtr<ClientConnection> FindClientByConnectionId(UINT32 a_connectionId);

	FRunnableThread* m_advertisementThread = nullptr;
	TUniquePtr<PCL::UdpClient> m_advertisementClient;
	TUniquePtr<PCL::TcpListener> m_listener;
	UINT32 m_instanceIdentifier{};

	PCL::TimePoint m_lastHeartbeatSendTime;

	FCriticalSection m_clientsMutex;
	TArray<TSharedPtr<ClientConnection>> m_clients;

	FCriticalSection m_receivedPacketQueueMutex;
	TQueue<TPair<TUniquePtr<INetworkMessage>, uint32_t>> m_receivedPacketQueue;
	uint32_t m_lastConnectionId{ 1 };

	friend class FAdvertisementThread;
};
So first it is obvious there is a bit more code in the UE5 version, that is because I needed some more functionality for the FRunnable class at the bottom, Unreal’s multi-threading class.
That aside though, there are some really tiny differences that are obvious and some less so. Unreal uses TSharedPtr, which stands for Templated Shared Pointer. They tend to use this naming convention for anything that uses templates, like TArray and TQueue as well as TUniquePtr. Those were easy to figure out.
Then there is the multi-threading stuff, there is quite a bit to talk about there.
First, we got the FRunnableThread*, which is where we store a pointer an FRunnable class we made called FAdvertisementThread like so (in this class’ constructor): Note: PLOG_INFO and PASSERT amongst some other debug macros have been updated to use Unreal’s Logging!
1
2
3
4
5
6
7
8
9
10
11
12
13
14
15
void ConnectionHandler::StartListeningForAdvertisements()
{
	// gets a number based on current time (to replace the previous std::random_device{}();
	m_instanceIdentifier = FDateTime::Now().GetTicks() & 0xFFFFFFFF;

	m_advertisementClient = MakeUnique<PCL::UdpClient>();
	m_advertisementClient->GetSocket().Bind(PCL::IPV4Address::Any, 0);
	m_listener = MakeUnique<PCL::TcpListener>();
	const bool startedListening = m_listener->TryStartListen(ListenPortRangeStart, ListenPortRangeEnd);
	PASSERT(startedListening, "Failed to start listening on a port within the specified range");

	m_advertisementThread = FRunnableThread::Create(new FAdvertisementThread(this), TEXT("AdvertisementThread"));

	PLOG_INFO("Comm", "Started advertising at a %f ms interval", AdvertisementInterval);
}
The line that matters here is the m_advertisementThread = FRunnableThread::Create(new FAdvertisementThread(this), TEXT("AdvertisementThread"));, since that creates the Runnable, so let’s get into that next.
Here is how Phil handled creating a thread:
1
	m_advertisementThread = std::thread(+[](void* user) { static_cast<ConnectionHandler*>(user)->BackgroundAdvertisementListener(); }, this);
then, the function BackgroundAdvertisementListener() has a while(true) loop. This works fine for his purpose since this is a hobby project for him, however, I’ll need to change this up to work with Unreal’s multi-threading and use a variable for stopping the loop. I have 2 FRunnable classes:
1
2
3
4
5
6
7
8
9
10
11
12
13
14
15
16
17
18
19
20
21
22
23
24
25
26
27
28
29
30
31
class FAdvertisementThread : public FRunnable
{
public:
	explicit FAdvertisementThread(ConnectionHandler* handler);
	virtual ~FAdvertisementThread() override = default;

	// FRunnable interface
	virtual bool Init() override;
	virtual uint32 Run() override;
	virtual void Stop() override;

	FThreadSafeBool m_stopThread = false;
private:
	ConnectionHandler* m_handler = nullptr;
};

class FClientListenThread : public FRunnable
{
public:
	explicit FClientListenThread(ConnectionHandler::ClientConnection* connection);
	virtual ~FClientListenThread() override = default;

	// FRunnable interface
	virtual bool Init() override;
	virtual uint32 Run() override;
	virtual void Stop() override;

	FThreadSafeBool m_stopThread = false;
private:
	ConnectionHandler::ClientConnection* m_connection = nullptr;
};
The first FRunnable is a thread the one that checks for new wands, while the second is one that checks for every wand whether it is still connected by trying to send data to it.
The function names are quite obvious too I believe.
Like I stated earlier though, I did have to change his while(true) loop into something that I could use in the UE’s thread system, so let’s take a look at the one for FAdvertisementThread:
1
2
3
4
5
6
7
8
9
10
11
12
13
UINT32 FAdvertisementThread::Run()
{
	FDateTime lastAdvertisement = FDateTime::Now().ToUnixTimestampDecimal() - m_handler->AdvertisementInterval;
	while (!m_stopThread)
	{
		if (m_handler)
		{
			if (m_handler->BackgroundAdvertisementListener(lastAdvertisement.ToUnixTimestampDecimal()))
				lastAdvertisement = FDateTime::Now();
		}
	}
	return 0;
}
In his function he uses time to only check every x seconds, so that is what the FDateTime is used for. FDateTime by the way replaces what std::chrono does in regular C++.
There is still a while() loop, however, it now has a variable, so that when Stop() is called, it ends the while() loop naturally.
The other Run() is pretty much the same thing but with a different function it calls.
Next up, still on the topic of multi-threading, std::mutex, the thing that prevents multiple threads from accessing the data at the same time. In UE we use FCriticalSection and then we can lock it like this:
1
FScopeLock lock(&m_clientsMutex);
So that was how I changed the std:: multi-threading to UE multi-threading. Having never worked with multi-threading before this project , it was a little confusing trying to figure out how everything worked together and at the same time. Yes the code was pretty much given to me, all I had to do was change it to UE code, but in order to keep the functionality the same, I still had to understand the very basics of multi-threading alongside how FRunnable works, which definitely took me some time.
There was a lot more code Phil gave me that I had to convert, including another class, however, it did boil down to just doing this more. Replacing types, slightly changing some functions to work the same way but for Unreal, and I think that repeating myself here any more is not useful, so I will move on to the next topic.
Next is something that Unreal is a bit odd with, headers. By default it tells you that you can use any type you’d like, TArray, TQueue, or functions like MoveTemp and it tells intellisense that this is just fine. The project builds, Unreal starts up and there are no issues. That is, until you try to package the plugin, then it will complain about all those types and functions you used, saying that it cannot find the definitions for them. It does not tell you what headers to include by default, which I had to learn the hard way. The headers are usually quite small, so that is a good thing, but it does end up looking like this:
1
2
3
4
5
6
7
8
9
10
11
12
13
14
15
16
17
18
19
20
21
22
23
24
25
#include "CoreMinimal.h"
#include "Modules/ModuleInterface.h"
#include "Subsystems/EngineSubsystem.h"
#include "HAL/Runnable.h"
#include "HAL/RunnableThread.h"
#include "HAL/ThreadSafeBool.h"
#include "Misc/DateTime.h"
#include "Misc/ScopeLock.h"
#include "Templates/UniquePtr.h"
#include "Templates/SharedPointer.h"
#include "Containers/Ticker.h"
#include "Templates/UnrealTemplate.h" // for MoveTemp
#include "Containers/Queue.h"
#include "Tickable.h"
#include "Engine/Engine.h"

#include "Modules/ModuleManager.h"  // Required for IMPLEMENT_MODULE

#include "NetworkTransport/INetworkMessage.h"

#include "PCL/TimePoint.h"
#include "PCL/Network/TcpListener.h"
#include "PCL/Network/UdpClient.h"

#include "ConnectionPlugin.generated.h"
That’s a lot of headers, but this could easily be fixed with some # pragma region , so it isn’t the worst thing.
There were some more things I learned throughout my experience though. For instance, there was a class or something somewhere that included a min/max, but that doesn’t gel well with Unreal, so in my Build.cs I had to include PublicDefinitions.Add("NOMINMAX"); in order to prevent it from doing that and allow Unreal to package the thing properly.
After converting the main part of Phil’s code, it was time to figure out how to make it update on its own. Of course Phil could just have a while(true) loop in his main, but I don’t have that luxury. Luckily, he did have an idea of how I could do it. He told me about UEngineSubsystem and FTickableGameObject.
The first would allow me to have a singleton, meaning I could easily access the system from the Blueprint functions, and the FTickableGameObject which would allow the system to have an update loop. The entire class header is shown below:
1
2
3
4
5
6
7
8
9
10
11
12
13
14
15
16
17
18
19
20
21
22
23
24
25
26
27
28
29
30
31
32
33
34
35
36
37
UCLASS()
class UConnectionPluginSystem : public UEngineSubsystem, public FTickableGameObject
{
	GENERATED_BODY()
public:
	// Called when the program starts
	virtual void Initialize(FSubsystemCollectionBase&) override;

	// Called every frame
	virtual void Tick(float DeltaTime) override;

	// Called when the program ends
	virtual void Deinitialize() override;

	// REQUIRED for ticking inside the editor
	virtual bool IsTickableInEditor() const override
	{
		return true;
	}

	// Tick even when game is paused
	virtual bool IsTickableWhenPaused() const override
	{
		return true;
	}

	int GetOffset()const
	{
		return m_offset;
	};
	virtual TStatId GetStatId() const override
	{
		return TStatId();
	}

	ConnectionHandler* handler;
};
So first there is the Unreal required stuff, UCLASS() and GENERATED_BODY() which are just required for Unreal to recognize this as a class and its contents.
It is also important that this plugin always ticks, regardless of whether the game is paused or if it is in engine, since we want the wands to always stay connected regardless.
Seeing as how this is the main class the project uses, it makes sense that the ConnectionHandler is in here and not in IModuleInterface, since that also exists, but I don’t actually use it.
The only thing that Tick() does is call Update() on handler, and Update just sends any packets to any connected clients, clean up disconnected ones or send heartbeats to connected clients.
Quick recap, so far:
- I have converted all of Phil’s code for the ConnectionHandler.cpp and .h, including multi-threading
- Created a singleton I could access anywhere that also Ticks
Next up is the actual blueprint code, which luckily was a lot simpler to figure out and make.
First, we needed some way of identifying which wand we want to send data to. In the Client Connection class, we get a unique identifier, an ID that tells us which wand it is. However, I thought it’d be better if the DP could simply select the wand type from an enum, so I looked up how to add a custom enum in C++ and ended up with this:
1
2
3
4
5
6
7
8
UENUM(BlueprintType)
enum class WandSelections : uint8
{
	Fire		UMETA(DisplayName = "Fire Wand"),
	Water		UMETA(DisplayName = "Water Wand"),
	Electric	UMETA(DisplayName = "Electric Wand"),
	All			UMETA(DisplayName = "All Wands")
};
Then, in my class UConnectionPluginBPLIbrary, I have a function that converts this enum to the UINT32 that I need:
1
2
3
4
5
6
7
8
9
10
11
12
13
14
15
16
17
18
19
20
21
22
.h

// helper function to convert an enum to the ID needed to call update the wand
static UINT32 GetClientIDFromEnum(const WandSelections wand);

.cpp

UINT32 UConnectionPluginBPLibrary::GetClientIDFromEnum(const WandSelections wand)
{
	switch (wand)
	{
		case WandSelections::Fire:
			return 1;
		case WandSelections::Water:
			return 2;
		case WandSelections::Electric:
			return 3;

		default:
			return 666; // Default case, should never happen
	}
}
As you are able to see, I get a enum and then return a UINT32 that is the client ID I need. Phil told me how I can change the client ID for each individual wand, so in this case, having these numbers be set manually is not a big deal, since if any of the numbers for the wands are wrong by default, I can easily modify them.
However, if let’s say, another person wants to use this Plugin, this obviously wouldn’t be very helpful for them since they might not be able to customize the client IDs. I don’t have to worry about that though so this works perfectly for me. Next up are the blueprint nodes. Below is the entire class:
1
2
3
4
5
6
7
8
9
10
11
12
13
14
15
16
17
UCLASS()
class UConnectionPluginBPLibrary : public UBlueprintFunctionLibrary
{
	GENERATED_BODY()

	UFUNCTION(BlueprintCallable, meta = (DisplayName = "Set Wand Color", Keywords = "Wand Set Color"), Category = "ConnectionPlugin")
	static bool SetColor(WandSelections wand = WandSelections::Fire, FColor color = FColor::Black);

	UFUNCTION(BlueprintCallable, meta = (DisplayName = "Set Wand Vibration Strength", Keywords = "Wand Set Vibration Strength",
			  Tooltip = "The vibration strength on this is not reset automatically so keep that in mind!"),
			  Category = "ConnectionPlugin")
	static bool SetVibrationStrength(WandSelections wand = WandSelections::Fire, uint8 strength = 0);

private:
	// helper function to convert an enum to the ID needed to call update the wand
	static UINT32 GetClientIDFromEnum(const WandSelections wand);
};
First you can see that once again, UCLASS() and GENERATED_BODY() are required for Unreal to recognize this class, it also inherits from UBlueprintFunctionLibrary which is required for making custom Blueprint libraries.
The static functions are the 2 Blueprint Nodes that this plugin adds.
They both return a bool stating whether or not the function succeeded, as I will show in a minute, it will return false if the SubSystem’s handler is a nullpointer, or if the function that sends data to the wands returns false (which is caused by the Client(s) not being found).
The function has multiple parameters, these will show up in the Node as well. It is also possible to return multiple variables which I did have at first but realized I had no use for. By making the parameter a reference (&), it becomes an Output instead of an Input parameter.
Right above the function, it has a macro that Unreal uses to turn the function into a Blueprint node. The parameters for the macro are quite self-explanatory, with the DisplayName being the name of the function, Keywords being words the user can type in when creating any Node to search for this wand, the Tooltip is shown when hovering over the Node and the Category is used for sorting the Blueprint Nodes into their own category.
Now onto the .cpp file.
1
2
3
4
5
6
7
8
9
10
11
12
13
14
15
16
17
18
19
20
21
22
23
24
25
26
27
28
29
30
31
32
33
34
35
36
37
38
39
40
41
void SetPacketLedColor(NetworkMessageSetLedColor& packet, const int index, const FColor color)
{
	packet.SetLedColor(index, color.R, color.G, color.B);
}

bool UConnectionPluginBPLibrary::SetColor(const WandSelections wand, const FColor color)
{
	const auto subsystem = GEngine->GetEngineSubsystem<UConnectionPluginSystem>();
	if (!subsystem->handler) return false;

	NetworkMessageSetLedColor packet;

	for (int i = 0; i < 8; ++i)
	{
		SetPacketLedColor(packet, i, color);
	}

	if (wand == WandSelections::All)
	{
		return subsystem->handler->SendToAllClients(packet);
	}
	else
	{
		return subsystem->handler->SendToClient(GetClientIDFromEnum(wand), packet);
	}
}

bool UConnectionPluginBPLibrary::SetVibrationStrength(const WandSelections wand, const uint8 strength)
{
	const auto subsystem = GEngine->GetEngineSubsystem<UConnectionPluginSystem>();
	if (!subsystem->handler) return false;

	if (wand == WandSelections::All)
	{
		return subsystem->handler->SendToAllClients(NetworkMessageSetVibration(strength));
	}
	else
	{
		return subsystem->handler->SendToClient(GetClientIDFromEnum(wand), NetworkMessageSetVibration(strength));
	}
}
So first I have a small function that just gets an FColor, which the user of the Node will provide, and sets the packet’s color to that FColor. I thought it’d look cleaner this way.
Then the SetColor function. First it tries to get the singleton UConnectionPluginSystem. This should always be true since the Plugin is always active in the background. I do however check whether the handler is a nullpointer before trying to access it.
I then set the color and send the data to either all wands, or just the selected wands, based on the WandSelections enum.
The SetVibrationStrength is pretty much the same. Get the singleton, check if handler isn’t nullpointer, then send the data to all or just one wand(s).
The result is this: 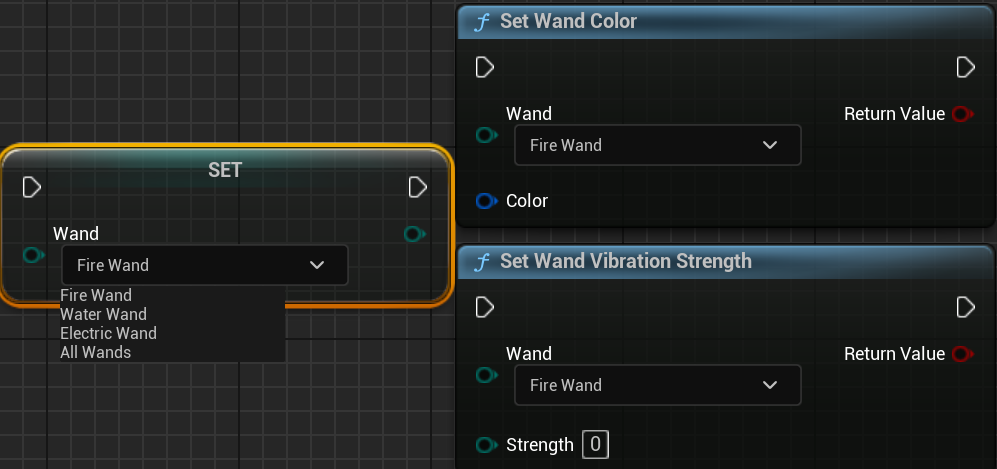
The 2 nodes with their input and output as well as the enum having all the options as shown in the script.
Now that we have the plugin and nodes, it is time to set it up for the actual wands.
This was in a testing scene, where we simply set the vibration and color at the start/end of the game:
So in order to make the variables easy to modify, I made a struct that controls all of the settings that the DP might need.
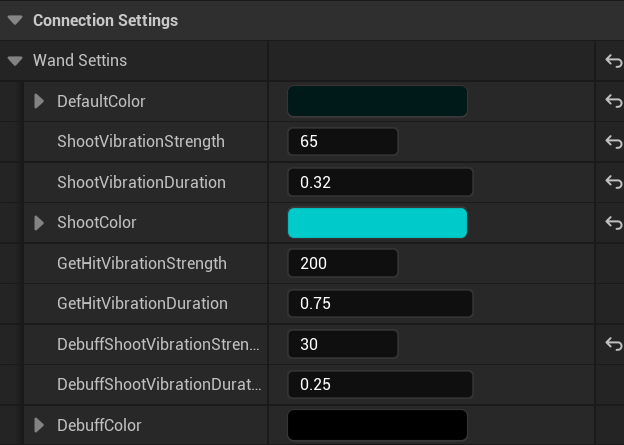
I added functionality for the wand in the wand Blueprint, like vibrating and glowing when shooting, same for getting hit and (as you can tell by variable names in the struct) some other small details anyone can easily modify. I did set all the variables for all the wands and discussed these with a DP that used to lead the 3Cs team (Colin) and he agreed with my settings after some tiny tweaks. I also did discuss it a lot with the one who made the 3D wands (Jacco) and he agreed with everything except for one color we tweaked.
In the end, it gives us an effect like this: